Create and Hack a Password Protected Folder without Software

Securing Confidential Data is a basic requirement of everyone. This can also be done through available Softwares on Internet. Now i will share a method to Lock folders Without using any Software.This Trick will work in windows XP,Vista and Windows 7.
Increase Windows Login & Shutdown Speed

Many of people facing the login and shutdown related problems in the windows os. Those who facing these kind of problem, kindly try below steps to increasing speed.
Just follow the below steps.......!!!!
1) Make sure "clear pagefile at shutdown" is not enabled:
start - run - regedit
[HKEY_LOCAL_MACHINE\SYSTEM\CurrentControlSet\Control\Session Manager\Memory Management]
Set ClearPageFileAtShutdown value to 0
2) Start - Run - Regedit
Navigate to the following Registry key:
HKEY CURRENT USER\Control Panel\Desktop
Double click on the AutoEndTasks entry and replace the 0 with a 1 in the Value data text box
For the next two, if the dword value indicated does not exist, create it:
Double click on the WaitToKillAppTimeout entry in the right pane and change the Value data to 2000
Double click on the HungAppTimeout entry in the right pane and change the Value data to 1000
Reboot
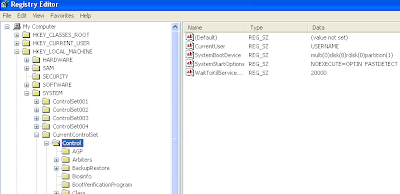
3) HKEY_LOCAL_MACHINE\SYSTEM\CurrentControlSet\Control
Right-click on WaitToKillServiceTimeout and change it to 2000
Thanks..
Create an XP Mode for Windows 7 Home Versions & Vista
One of the cool features in Windows 7 is XP Mode. However, it’s only available for Windows 7 Professional and above, leaving Home Edition and Vista users out of luck. Today we’ll show you how to create your own XP Mode to run on Vista or Windows 7 Home Premium.
How does this work?
Windows 7 Home Premium and Windows Vista are not licensed to run the free XP Mode download from Microsoft. In fact, if you select Home Premium on the XP Mode download site, you will see the following message:

How does this work?
Windows 7 Home Premium and Windows Vista are not licensed to run the free XP Mode download from Microsoft. In fact, if you select Home Premium on the XP Mode download site, you will see the following message:

Even VMware Player doesn’t have a link to import XP Mode if you’re computer is running 7 Home Premium or Vista.

However, if you have a legal copy of Windows XP, then you can easily recreate XP Mode with the free VMware Player. This article will show you how quick and easy it is to get a virtual copy of XP running on any computer, even if it’s running 7 Home Premium or Windows Vista.
Bootable Pendrive For Windows 8

Windows 8 is the hot topic now these days. There is no such utility to install it through pendrive. But today i will give you a trick to install windows 8 through USB.
Step 3: Create a bootable Windows 8 USB drive
Insert the USB. Install the Windows 7 USB/DVD tool. Once the utility opens, you should be able to browse for and select the Windows 8 ISO. Start the process. The process takes about five minutes depending on the speed of your drive. You'll see a message that reads "backup completed" when it's done.
 Its finish now. You can use this pendrive for installation. so now no need of DVD.
Thanks..
Enjoy..
How to Make USB Drives Read Only

HKEY_LOCAL_MACHINE\SYSTEM\CurrentControlSet\Control\StorageDevicePolicies
How to Remove Read Only Protection From USB Drive
 Hi friends.Some of our readers who wanted to know the methods how to remove the Write Protected error from their USB drives like Pen Drives and memory cards. Here we shared some methods to remove the write protection from usb drive.
1. Start > search bar -> CMD and press enter
2. type< diskpart
3. type< list disk
4. type< select disk # (# is the number of the USB HDD you’ve plugged in )
5. type< attributes disk clear read only.
Thankhs..
Enjoy...
How to use Windows 7 without activation

Hi do you know that it is possible to use Windows 7 and Vista for 120 days without activation. This is actually possible using the slmgr -rearm command which will extend the grace period from 30 days to 120 days. However in this post I will show you a small trick using which it is possible to use Windows 7 without activation for approximately 1 year! Here is a way to Use windows 7 without activation.
1. Goto “Start Menu -> All Programs -> Accessories” . Right click on “Command Prompt” and select “Run as Administrator“. If you are not the administrator then you are prompted to enter the password.

2. Now type the following command and hit enter
slmgr -rearm
3. You will be prompted to restart the computer. Once restarted the trial period will be once again reset to 30 days. You can use the above command for up to 3 times by which you can extend the trial period to 120 days without activation.
4. Now comes the actual trick by which you can extend the trial period for another 240 days. Open Registry Editor (type regedit in “Run” and hit Enter) and navigate to the following location
HKEY_LOCAL_MACHINE\SOFTWARE\Microsoft\Windows NT\CurrentVersion\SoftwareProtectionPlatform
5. In right-side pane, change value of SkipRearm to 1 .
6. Now you will be able to use the slmgr -rearm command for another 8 times so that you can skip activation process for another 240 days. So you will get 120 + 240 = 360 days of free Windows 7 usage.
120 days using “slmgr -rearm” command before registry edit
+
240 days using “slmgr -rearm” command after registry edit
=
360 Days
Thanks..
Enjoy..
How to secure your wireless router

This is step by step on how to secure your wireless router.
1) Connect your wireless router per the instructions in your user manual.
2) Open your Internet browser and enter the IP address assigned to your router. Major manufacturers assign different default IP addresses to their routers. For example, Netgear routers use 192.168.0.1 while Linksys uses 192.168.1.1. Consult your manual for details.
3) Log in to your router configuration by typing the username and password specified in your manual.
4) Set your Service Set Identificatier (SSID) by typing it into the box. This is the name of your wireless network. Make it a unique phrase; the default SSID is usually the name of the router manufacturer, such as Netgear or Belkin.
5) Set your wireless network's security protocol to WPA 2.0 -- Wi-Fi Protected Access. This encrypts any data sent over the network and allows access only to users who have
the security key. Set your security key as something not easily guessed. A string of random numbers and letters is recommended. Be sure to record this security key in a safe place so you can recall it when adding a new device to your network or changing network security settings.
Thanks..
Enjoy...

Securing Confidential Data is a basic requirement of everyone. This can also be done through available Softwares on Internet. Now i will share a method to Lock folders Without using any Software.This Trick will work in windows XP,Vista and Windows 7.
Why to Use this Method?
*. If you are afraid of getting Viruses through Softwares(This Technique is completely Safe ).
*. If you are using PC of someone else and want to do some prankand not having enough time to download and install Softwares.
*. If for some reason you are not able to Install Softwares on PC.
How to do it?
*. Open Notepad ( Start->Run->Notepad)
*. Copy the Code below and Paste it into Notepad .
cls
:End
@ECHO OFF
title Folder Locker
if EXIST "Control Panel.{21EC2020-3AEA-1069-A2DD-08002B30309D}" goto UNLOCK
if NOT EXIST Locker goto MDLOCKER
:CONFIRM
echo Are you sure u want to Lock the folder(Y/N)
set/p "cho=>"
if %cho%==Y goto LOCK
if %cho%==y goto LOCK
if %cho%==n goto END
if %cho%==N goto END
echo Invalid choice.
goto CONFIRM
:LOCK
ren Locker "Control Panel.{21EC2020-3AEA-1069-A2DD-08002B30309D}"
attrib +h +s "Control Panel.{21EC2020-3AEA-1069-A2DD-08002B30309D}"
echo Folder locked
goto End
:UNLOCK
echo Enter password to Unlock folder
set/p "pass=>"
if NOT %pass%==computerplanet4u goto FAIL
attrib -h -s "Control Panel.{21EC2020-3AEA-1069-A2DD-08002B30309D}"
ren "Control Panel.{21EC2020-3AEA-1069-A2DD-08002B30309D}" Locker
echo Folder Unlocked successfully
goto End
:FAIL
echo Invalid password
goto end
:MDLOCKER
md Locker
echo Locker created successfully
goto End
*. Password for the above batch file is set to computerplanet4u . You can change it to anything by editing computerplanet4u to your choice in following line:
if NOT %pass%== computerplanet4u goto FAIL
*. Now Save this file with a name anyname.bat (here .bat is the extension). I am choosing computerplanet4u.bat as my file name in this tutorial.
*. Now a Bat file is created.
*. Now double click on bat file and it will ask you for password and Enter Password (for the above code it is computerplanet4u).
*. Now you will see a folder named LOCKER in the same location where you saved anyname.bat (computerplanet4u.bat here) file.
*. Open it and fill it with the data you wanna hide.
*. When you are done with the above press Y in the bat file and hit Enter.
*. Now Close this Bat file window and locker folder will hide itself.
*. Again to Edit Locker Folder double click computerplanet4u.bat file and enter password .
You can do it as many times as you want. :)
Thanks..
Enjoy..
Increase Windows Login & Shutdown Speed
Many of people facing the login and shutdown related problems in the windows os. Those who facing these kind of problem, kindly try below steps to increasing speed.
Just follow the below steps.......!!!!
1) Make sure "clear pagefile at shutdown" is not enabled:
start - run - regedit
[HKEY_LOCAL_MACHINE\SYSTEM\CurrentControlSet\Control\Session Manager\Memory Management]
Set ClearPageFileAtShutdown value to 0
2) Start - Run - Regedit
Navigate to the following Registry key:
HKEY CURRENT USER\Control Panel\Desktop
Double click on the AutoEndTasks entry and replace the 0 with a 1 in the Value data text box
For the next two, if the dword value indicated does not exist, create it:
Double click on the WaitToKillAppTimeout entry in the right pane and change the Value data to 2000
Double click on the HungAppTimeout entry in the right pane and change the Value data to 1000
Reboot
3) HKEY_LOCAL_MACHINE\SYSTEM\CurrentControlSet\Control
Right-click on WaitToKillServiceTimeout and change it to 2000
That's it......
Thanks..
Enjoy..
Create an XP Mode for Windows 7 Home Versions & Vista
One of the cool features in Windows 7 is XP Mode. However, it’s only available for Windows 7 Professional and above, leaving Home Edition and Vista users out of luck. Today we’ll show you how to create your own XP Mode to run on Vista or Windows 7 Home Premium.
How does this work?
Windows 7 Home Premium and Windows Vista are not licensed to run the free XP Mode download from Microsoft. In fact, if you select Home Premium on the XP Mode download site, you will see the following message:
How does this work?
Windows 7 Home Premium and Windows Vista are not licensed to run the free XP Mode download from Microsoft. In fact, if you select Home Premium on the XP Mode download site, you will see the following message:
Even VMware Player doesn’t have a link to import XP Mode if you’re computer is running 7 Home Premium or Vista.
However, if you have a legal copy of Windows XP, then you can easily recreate XP Mode with the free VMware Player. This article will show you how quick and easy it is to get a virtual copy of XP running on any computer, even if it’s running 7 Home Premium or Windows Vista.
Getting Started
First, download and install VMware Player (link below). It is a free download, but requires registration.

You may see some prompts about installing drivers; simply approve them. We didn’t see them on our latest test, but have in the past. When you are finished installing VMware Player, you will have to restart your computer.
![sshot-2010-02-16-[19-14-34]](http://www.howtogeek.com/wp-content/uploads/2010/02/sshot20100216191434.png)
Create your own XP Mode
Once your computer is rebooted, start up VMware Player and insert your Windows XP CD in your CD drive. In this example we used a copy of Windows XP Professional, but it would work the same with any edition of XP.
In VMware Player, click the link at the top that says “Create a New Virtual Machine.”

VMware automatically detects your Windows XP CD, and says it will install it with Easy install. This will let you install XP with only 5 clicks! Click Next to continue.

Now enter your XP product key, and name and password of your choice. We named it XP Mode to make it obvious what this virtual machine is for!

Here VMware will automatically enter your operating system’s name and the default location to save the files. Simply press next to accept the defaults, or change them if you wish.

You can choose how large you want your virtual hard drive to be; the default is 40Gb, but you can choose a different size if you wish. Please note that the entire 40Gb will not be taken up on your hard drive. Our clean install only took up 1.4Gb on the computer.

That’s all the settings. You can review and make changes here, or simply press Finish to start installing XP.

From here on, VMware will take over. You do not need to click anything else until XP is fully installed! It will automatically run the installer, format the virtual hard drive,

Copies XP files to the hard drive,

And finishes the install.
 Everything will work automatically, so you can literally leave it unattended while it’s installing. In our tests it took about 20 minutes to install. When it’s done, you’ll be presented with the Windows XP desktop ready for use!

VMware Player will automatically launch the VMware Tools installer to integrate your virtual XP with your computer. It may have to download or update the tools, so if you see the yellow banner at the bottom of your window simply click Update Tools or Install Tools depending on you situation.

The tools will automatically download and install, though you may have to approve an UAC prompt.

Once the tools are downloaded or updated, they should automatically run in XP. If not, click Start, then My Computer, and finally double-click on the CD drive which should say VMware Tools.
![sshot-2010-02-16-[20-02-36]](http://www.howtogeek.com/wp-content/uploads/2010/02/sshot20100216200236.png)
Now, simply run the Tools installer with the Typical setup type, and reboot XP when it’s finished.

Now your XP is fully installed and setup, so you can proceed to integrate with your computer just like XP Mode!
Integrate XP Mode in VMware Player with Windows 7 or Vista
The real advantage of the default XP Mode in Windows 7 is that the XP programs are fully integrated with their Windows 7 counterparts. You can run them seamlessly with other programs, copy between them, and even open and save files to the same folders.
Let’s set this up in VMware. Copy and paste from Windows 7 or Vista to XP in VMware is activated by default. To use your XP programs seamlessly with Windows 7, click VM on the top of the VMware window, and click “Enter Unity.”

You can easily access any program or file in XP mode through a dedicated XP Mode Start Menu. When you hover over your Windows 7 Start button, a new button called “Windows XP Mode” will above it. Click there to access a full start menu from XP Mode right in Windows 7.

And it works the exact same in Windows Vista.

Here is an IE 6 window from XP running side-by-side with IE 8 in Windows 7, thanks to VMware Player!

And notice, this is guaranteed to work on any edition of Windows 7 or Vista, including Home versions.

By default, the virtualized windows will have a border and the VMware logo on their edge.
![sshot-2010-02-16-[20-21-39]](http://www.howtogeek.com/wp-content/uploads/2010/02/sshot20100216202139.png)
To remove this logo, click VM in the VMware player window, then settings. Click on the Options tab, and choose Unity on the left. Now uncheck the boxes that say “Show borders” and “Show badges.”

Without having the VMWare borders and badges give everything a more authentic XP Mode look and feel.
![sshot-2010-02-16-[20-23-15]](http://www.howtogeek.com/wp-content/uploads/2010/02/sshot20100216202315.png)
You can even use removable devices, such as flash drives, in XP in VMware Player. Whenever you connect a new device to your computer, VMware will remind you that you can add it to XP.

Simply click VM, then Removable Devices. Select your device name, and click Connect.

Save Files in XP Mode to My Documents in Windows 7 or Vista
By default, files created in XP in VMware Player will be saved inside the virtual machine. It’s more convenient if they’re saved directly to the My Documents folder in Windows 7 (or the Documents folder in Vista), so let’s change this. Click VM, then Settings. Click the Options tab, and then choose Shared Folders on the left. Now click the bullet for “Always enabled” and check the box for “Map as a network drive in Windows guests.”

Now click Add at the bottom of that window. This will let us add a shared folder.

Let’s add the My Documents folder from Windows 7 (or the Documents folder in Vista). Click Browse, and then select your My Documents folder. Click Ok, and then click Next.

Make sure the box is checked that says “Enable this share” and then click Finish. You can now close the settings window as well.

Back in XP, click Start, then right click on My Documents, and select Properties.

Click Move to find the new My Documents folder.

Find the folder we just shared from Windows 7 or Vista by clicking My Computer, then the drive that says “Shared Folders on ‘vmware-host’” or something similar. Now select the folder we shared, Documents, and click Ok.

Click Ok in the main properties window. It may offer to copy the files from your old My Documents folder to the new one; choose Yes to make sure you have all of your documents in Windows 7.

Now, whenever you go to save a file in XP, it will automatically save in your My Documents folder on Windows 7 or Vista, depending on your circumstance. You can repeat the same process for any folder you wish, such as your My Pictures and My Music folders.
Conclusion
And that’s all there is to it! You now have a fully functioning copy of XP running right inside your 7 or Vista computer. Almost everything works the same as XP Mode in 7 Professional or Ultimate. The only difference is that you used your own copy of XP, but if you have an old copy already then it doesn’t cost you any more than XP Mode would. And, even if your computer is running Windows 7 Professional, you may find it easier to use a copy of XP you already own instead of importing XP Mode. VMware Player does a great job at integrating XP with your computer, and in our tests it worked as good or better than the actual XP Mode.
You can actually run Windows Virtual PC on any Windows 7 computer, even ones running Home Premium that aren’t eligible for XP Mode. You could install XP in it, then install Virtual PC’s integration components, and it will work exactly like the default XP Mode. However, we’ve found VMware’s solution easier to use and much faster to setup. If you would like to try this out, download Virtual PC at the link below (be sure to select Professional as your edition of Windows … even though Home Premium is licensed to run Virtual PC and can run it fine, the download isn’t offered by default).
Links
Download VMware Player 3
Download Windows Virtual PC if you wish to run XP in it
First, download and install VMware Player (link below). It is a free download, but requires registration.
You may see some prompts about installing drivers; simply approve them. We didn’t see them on our latest test, but have in the past. When you are finished installing VMware Player, you will have to restart your computer.
Create your own XP Mode
Once your computer is rebooted, start up VMware Player and insert your Windows XP CD in your CD drive. In this example we used a copy of Windows XP Professional, but it would work the same with any edition of XP.
In VMware Player, click the link at the top that says “Create a New Virtual Machine.”
VMware automatically detects your Windows XP CD, and says it will install it with Easy install. This will let you install XP with only 5 clicks! Click Next to continue.
Now enter your XP product key, and name and password of your choice. We named it XP Mode to make it obvious what this virtual machine is for!
Here VMware will automatically enter your operating system’s name and the default location to save the files. Simply press next to accept the defaults, or change them if you wish.
You can choose how large you want your virtual hard drive to be; the default is 40Gb, but you can choose a different size if you wish. Please note that the entire 40Gb will not be taken up on your hard drive. Our clean install only took up 1.4Gb on the computer.
That’s all the settings. You can review and make changes here, or simply press Finish to start installing XP.
From here on, VMware will take over. You do not need to click anything else until XP is fully installed! It will automatically run the installer, format the virtual hard drive,
Copies XP files to the hard drive,
And finishes the install.
VMware Player will automatically launch the VMware Tools installer to integrate your virtual XP with your computer. It may have to download or update the tools, so if you see the yellow banner at the bottom of your window simply click Update Tools or Install Tools depending on you situation.
The tools will automatically download and install, though you may have to approve an UAC prompt.
Once the tools are downloaded or updated, they should automatically run in XP. If not, click Start, then My Computer, and finally double-click on the CD drive which should say VMware Tools.
Now, simply run the Tools installer with the Typical setup type, and reboot XP when it’s finished.
Now your XP is fully installed and setup, so you can proceed to integrate with your computer just like XP Mode!
Integrate XP Mode in VMware Player with Windows 7 or Vista
The real advantage of the default XP Mode in Windows 7 is that the XP programs are fully integrated with their Windows 7 counterparts. You can run them seamlessly with other programs, copy between them, and even open and save files to the same folders.
Let’s set this up in VMware. Copy and paste from Windows 7 or Vista to XP in VMware is activated by default. To use your XP programs seamlessly with Windows 7, click VM on the top of the VMware window, and click “Enter Unity.”
You can easily access any program or file in XP mode through a dedicated XP Mode Start Menu. When you hover over your Windows 7 Start button, a new button called “Windows XP Mode” will above it. Click there to access a full start menu from XP Mode right in Windows 7.
And it works the exact same in Windows Vista.
Here is an IE 6 window from XP running side-by-side with IE 8 in Windows 7, thanks to VMware Player!
And notice, this is guaranteed to work on any edition of Windows 7 or Vista, including Home versions.
By default, the virtualized windows will have a border and the VMware logo on their edge.
To remove this logo, click VM in the VMware player window, then settings. Click on the Options tab, and choose Unity on the left. Now uncheck the boxes that say “Show borders” and “Show badges.”
Without having the VMWare borders and badges give everything a more authentic XP Mode look and feel.
You can even use removable devices, such as flash drives, in XP in VMware Player. Whenever you connect a new device to your computer, VMware will remind you that you can add it to XP.
Simply click VM, then Removable Devices. Select your device name, and click Connect.
Save Files in XP Mode to My Documents in Windows 7 or Vista
By default, files created in XP in VMware Player will be saved inside the virtual machine. It’s more convenient if they’re saved directly to the My Documents folder in Windows 7 (or the Documents folder in Vista), so let’s change this. Click VM, then Settings. Click the Options tab, and then choose Shared Folders on the left. Now click the bullet for “Always enabled” and check the box for “Map as a network drive in Windows guests.”
Now click Add at the bottom of that window. This will let us add a shared folder.
Let’s add the My Documents folder from Windows 7 (or the Documents folder in Vista). Click Browse, and then select your My Documents folder. Click Ok, and then click Next.
Make sure the box is checked that says “Enable this share” and then click Finish. You can now close the settings window as well.
Back in XP, click Start, then right click on My Documents, and select Properties.
Click Move to find the new My Documents folder.
Find the folder we just shared from Windows 7 or Vista by clicking My Computer, then the drive that says “Shared Folders on ‘vmware-host’” or something similar. Now select the folder we shared, Documents, and click Ok.
Click Ok in the main properties window. It may offer to copy the files from your old My Documents folder to the new one; choose Yes to make sure you have all of your documents in Windows 7.
Now, whenever you go to save a file in XP, it will automatically save in your My Documents folder on Windows 7 or Vista, depending on your circumstance. You can repeat the same process for any folder you wish, such as your My Pictures and My Music folders.
Conclusion
And that’s all there is to it! You now have a fully functioning copy of XP running right inside your 7 or Vista computer. Almost everything works the same as XP Mode in 7 Professional or Ultimate. The only difference is that you used your own copy of XP, but if you have an old copy already then it doesn’t cost you any more than XP Mode would. And, even if your computer is running Windows 7 Professional, you may find it easier to use a copy of XP you already own instead of importing XP Mode. VMware Player does a great job at integrating XP with your computer, and in our tests it worked as good or better than the actual XP Mode.
You can actually run Windows Virtual PC on any Windows 7 computer, even ones running Home Premium that aren’t eligible for XP Mode. You could install XP in it, then install Virtual PC’s integration components, and it will work exactly like the default XP Mode. However, we’ve found VMware’s solution easier to use and much faster to setup. If you would like to try this out, download Virtual PC at the link below (be sure to select Professional as your edition of Windows … even though Home Premium is licensed to run Virtual PC and can run it fine, the download isn’t offered by default).
Links
Download VMware Player 3
Download Windows Virtual PC if you wish to run XP in it
Bootable Pendrive For Windows 8
Windows 8 is the hot topic now these days. There is no such utility to install it through pendrive. But today i will give you a trick to install windows 8 through USB.
Follow Simple Steps:
Step 1: Take 4GB or more USB.
Step 2: Download Windows 8 and the Windows 7 USB/DVD tool
Note: Windows 7 USB tool working fine with windows 8.
Insert the USB. Install the Windows 7 USB/DVD tool. Once the utility opens, you should be able to browse for and select the Windows 8 ISO. Start the process. The process takes about five minutes depending on the speed of your drive. You'll see a message that reads "backup completed" when it's done.

Thanks..
Enjoy..
How to Make USB Drives Read Only
If you want to prevent information on your computer from leaking out but need the ability to read data from a USB drive.This method will prevent write access on your computer’s USB ports.This can be easily done with a registry key.
1.Click Start, and then click Run.
2.In the Open box, type regedit, and then click OK.
1.Click Start, and then click Run.
2.In the Open box, type regedit, and then click OK.
3.Navigate to following registry key:
HKEY_LOCAL_MACHINE\SYSTEM\CurrentControlSet\Control
4. Right click on control, navigate to new and create new key, Change the name as StorageDevicePolicies
5. Right click on it,navigate to new\DWORD and name it as WriteProtect
6. Right click on it, modify 0 as 1 in the value
7.Quit Registry Editor.
The USB ports on your computer are now read only. To make them capable of writing data again, change the value of the WriteProtect key to 0.
1.Click Start, and then click Run.
2.In the Open box, type regedit, and then click OK.
3.Navigate to following registry key:
HKEY_LOCAL_MACHINE\SYSTEM\CurrentControlSet\Control\StorageDevicePolicies
4.In the right pane, double-click “WriteProtect”.
5.In the Value data box, enter 0, and then click OK.
6.Quit Registry Editor.
Thanks..
Enjoy..
How to Remove Read Only Protection From USB Drive
Hi friends.Some of our readers who wanted to know the methods how to remove the Write Protected error from their USB drives like Pen Drives and memory cards. Here we shared some methods to remove the write protection from usb drive.
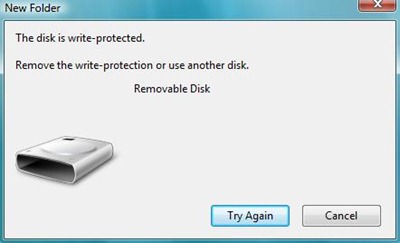
Error : The disk is write-protected. Remove the write-protection or use another drive
How to Remove Read Only Protection
There are many reasons that cause this problem, let’s see solutions...
First confirm you properly connected the device.
Search for a lock switch Some USB drives and Memory cards have a switch that allows you to lock drive and prevent any changes. Examine the USB drive or Memory card closely. If you can find the switch, switch it to the other side to turn the protection off.
Scan Drive with Updated Antivirus The problem can also be caused by some virus activity so just get it scanned by some updated good anti virus which may solve your problem.if you don't have updated antivirus. Use free Kaspersky virus removal tool.
Check Permissions (actually write-protected?) a) Right-click on external hard drive and select properties in the explorer windows.
b) In the properties window, select the security tab.
c) Select the ‘user’ under user name and click on ‘Edit’.
d) Check if you have Write permissions. If you don’t, check the option “Full” for full permissions or “Write” for write permissions.
b) In the properties window, select the security tab.
c) Select the ‘user’ under user name and click on ‘Edit’.
d) Check if you have Write permissions. If you don’t, check the option “Full” for full permissions or “Write” for write permissions.
Modify a registry key StorageDevicePolicies. 1. Open Start Menu ,
2. Run, type regedit and press Enter, this will open the registry editor.
3. Navigate to the following path:
2. Run, type regedit and press Enter, this will open the registry editor.
3. Navigate to the following path:
HKEY_LOCAL_MACHINE\SYSTEM\CurrentControlSet\Control\StorageDevicePolicies
If you can’t find the key StorageDevicePolicies , go to step 7. 4. Double click the key WriteProtect in the right pane and set the value to 0 In the Value Data Box and press OK button
5. Exit Registry
6. Reboot your pc.
5. Exit Registry
6. Reboot your pc.
If you can’t find the key StorageDevicePolicies in step (3) you have to create it manually.
7. Right-click HKEY_LOCAL_MACHINE\SYSTEM\CurrrentControlSet\Control\ and select New -> Key.
8. Enter the name StorageDevicePolicies.
9. Click on the new registry key StorageDevicePolicies and on the right pan right-click, select New > DWORD and give it the name WriteProtect.
10. Double click on it and set its value to 0.
8. Enter the name StorageDevicePolicies.
9. Click on the new registry key StorageDevicePolicies and on the right pan right-click, select New > DWORD and give it the name WriteProtect.
10. Double click on it and set its value to 0.
Also see : How to Make USB Drives Read Only
Using Diskpart
1. Start > search bar -> CMD and press enter
2. type< diskpart
3. type< list disk
4. type< select disk # (# is the number of the USB HDD you’ve plugged in )
5. type< attributes disk clear read only.
Format your USB drive
If still the usb drive is write protected then you can execute a “low-level format” on the drive. Download the free software to perform the “low-level format” of your USB drive.
After completing the low-level-format you may have to create a partition in that disk drive.
For that :
1. Run diskmgmt.msc in Run.
2. In the disk management window, select the pen drive, right click on it and click on Format.
3. Click OK and the drive will be reusable after this.
For that :
1. Run diskmgmt.msc in Run.
2. In the disk management window, select the pen drive, right click on it and click on Format.
3. Click OK and the drive will be reusable after this.
If you still receive the error "The disk is write-protected.Remove the write-protection or use another drive". The only solution is then to through out your USB drive and buy a new one..
We hope this post will help you !
Enjoy...
How to use Windows 7 without activation
Hi do you know that it is possible to use Windows 7 and Vista for 120 days without activation. This is actually possible using the slmgr -rearm command which will extend the grace period from 30 days to 120 days. However in this post I will show you a small trick using which it is possible to use Windows 7 without activation for approximately 1 year! Here is a way to Use windows 7 without activation.
1. Goto “Start Menu -> All Programs -> Accessories” . Right click on “Command Prompt” and select “Run as Administrator“. If you are not the administrator then you are prompted to enter the password.
2. Now type the following command and hit enter
slmgr -rearm
3. You will be prompted to restart the computer. Once restarted the trial period will be once again reset to 30 days. You can use the above command for up to 3 times by which you can extend the trial period to 120 days without activation.
4. Now comes the actual trick by which you can extend the trial period for another 240 days. Open Registry Editor (type regedit in “Run” and hit Enter) and navigate to the following location
HKEY_LOCAL_MACHINE\SOFTWARE\Microsoft\Windows NT\CurrentVersion\SoftwareProtectionPlatform
5. In right-side pane, change value of SkipRearm to 1 .
6. Now you will be able to use the slmgr -rearm command for another 8 times so that you can skip activation process for another 240 days. So you will get 120 + 240 = 360 days of free Windows 7 usage.
120 days using “slmgr -rearm” command before registry edit
+
240 days using “slmgr -rearm” command after registry edit
=
360 Days
Thanks..
Enjoy..
How to secure your wireless router
This is step by step on how to secure your wireless router.
1) Connect your wireless router per the instructions in your user manual.
2) Open your Internet browser and enter the IP address assigned to your router. Major manufacturers assign different default IP addresses to their routers. For example, Netgear routers use 192.168.0.1 while Linksys uses 192.168.1.1. Consult your manual for details.
3) Log in to your router configuration by typing the username and password specified in your manual.
4) Set your Service Set Identificatier (SSID) by typing it into the box. This is the name of your wireless network. Make it a unique phrase; the default SSID is usually the name of the router manufacturer, such as Netgear or Belkin.
5) Set your wireless network's security protocol to WPA 2.0 -- Wi-Fi Protected Access. This encrypts any data sent over the network and allows access only to users who have
the security key. Set your security key as something not easily guessed. A string of random numbers and letters is recommended. Be sure to record this security key in a safe place so you can recall it when adding a new device to your network or changing network security settings.
Thanks..
Enjoy...
No comments:
Post a Comment